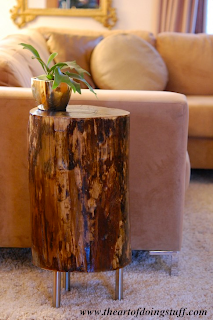
Ones trash is another persons treasure is probably my life motto. After seeing a fellow blogger (carriebradshawlied.com) do this project and seeing stumps in all the stores and magazines. I have been on the lookout for a stump. Here is my vision I was going for:
A few weekends ago I was visiting a friend in Memphis and had gone on a run/walk while she had something to do and came up on a huge pile of wood. Well of course I looked through it and found an awesome stump! I ran straight back to her house and talked Lane into helping me. We drove over to the house and attempted to get the stump. (Rule #1 get a lighter stump then I did) We couldn't pick it up so we started rolling it in the street to try to get it into my car. Luckily a few neighbors were watching us and a nice man came over and helped us pick it up and put it in my car.
Then I drove my stump home to Jackson (me and the stump riding along together for 3 hours)! When I got back to Jackson I had to figure out now how to get it out of my car. (Rule #2 put something down in your car if you can, seat covered in mud/dirt) I had to recruit my roommates boyfriend (thanks Dan) to come help me get it out. Dan picked it up and dropped it straight in our front yard. So that's where the stump has been sitting for the last 3 weeks. Sorry neighbors!!!
(Rule #3 if you can try not to let your stump get rained on! It will delay your debarking, painting process)So since my stump got soaked I have been delayed in painting it and have been letting its dry out. The longer you let it dry out the better.
What all you need:
Stump
Hammer
Flat head screwdriver
Gloves
Sandpaper
Paint
Paint brush
Legs (optional)
Step 1:
Debark your stump. Some pictures I saw the people still have the bark. I did alot
Step 2:
Sand your stump smooth. If you take the bark of fully and carefully you want have that much sanding to do. I just used regular pieces of sandpaper and made sure the edges were smooth and all the hair was off the stump. My neighbor offered an electric sander but I didn't think I needed that but you might.
Step 3:
Painting your stump. You can just paint yours with polyurethane and have a glossy natural wood look. I wanted mine white so I borrowed some leftover glossy white paint of my parents. Free paint! Girl on a budget here. Free stump, free paint. Paint the entire stump top, sides. I didn't paint the bottom but you are welcome too. It takes multiple coats.
Step 4:
Optional legs. A few stumps I have seen people have ordered legs from Ikea. My stump was pretty tall (and heavy) so I didn't think I needed legs but I wanted something to amp it up. So I "borrowed" from my moms plant some of those lion feet that you sit planted plants on. They were clay colored so I painted those as well.
NOTE TO SELF: get a stump that someone you know can actually pick up and put it in your house. I got a stump that only a super hero could pick up. So where does the stump sit: in our yard. Nice yard art though!!
Enjoy!
XoXo Bon
XoXo Bon


No comments:
Post a Comment