Monday, August 20, 2012

PhotoDay.Blue


Have a fabulous Monday! Say a prayer of thanksgiving today!

XoXo Bon


Tuesday, August 14, 2012

Random.

Erin Condren Stationary 

Some of my readers might already know about this little secret but I wanted to let the rest of you in if you don't already know about it. My cousin Carol moved to LA to become an amazing photographer. While in LA she met a California boy and they got married and now have 3 adorable little ones. Carol's sister in law happens to have this amazing stationary line. My mom ordered me my first product but I am totally obsessed with ErinCondren stationary. Everyone should go check out her website! Here are a few pics of some of the stuff I have ordered over the past few years.


 Go check out her website here

Enjoy!!

XoXo Bon

Enjoy this beautiful sunny day! 


Wednesday, August 8, 2012

Random.DIY.


Easy and Cheap DIY Wreath


I needed a new wreath for our little house in Belhaven. I loved this one when I saw it! All you need is a few things from Hobby Lobby and about 15 minutes and you are done!

What you will need:
  • wreath ($5)
  • letter ($2) My roommates and I have no initials in common, first or last names, so I just decided to use the initial for our street name (gooby I know!!)
  • brown twine
  • glue gun
  • glue sticks
  • random fabric or already formed flowers (I was going to buy just little scraps of fabric and roll them into roses like the wreath above but it was cheaper to just buy some flowers from the scrapbook section and use those


To Do: 
1. First you need to wrap your letter with the twine. I wrapped mine with about 4 different pieces of twine so I could wrap the curve of the P. Just hot glue it on the back when you start a new piece and keep the twine close so the color of the letter want shine through.


2. Glue on however many flowers you want


3. Glue the letter to the wreath


4. Glue a few more flowers to the wreath
Its that easy!


My finished product!!


Enjoy!
XoXo Bon


Tuesday, August 7, 2012

Random.DIY.

Lamp Shade Makeover

I went to Anthropologie the other day and they had the cutest lamp shades. I think a lamp shade can make a lamp and space look much more put together. I did a little internet surfing and found a lamp shade that I wanted to copy. It didn't look like it would be that hard and the shade actually turned out great! Wanted to share it with my readers so each of you could do it. It took about 1 hour and cost about $10.00.

Lamp shades from Anthropologie that were my inspiration!


This is what I wanted mine to look like and the shade that I tried to duplicate


What you need:
lamp shade
glue sticks
glue gun
burlap
iron
scissors

My shade!


1. First you need to cut your burlap into strips the larger the strips the larger the ruffle you have. The width of the ruffle I think depends on the size of the lamp shade. My shade was pretty big.


2. Fold each of the strips and iron them in half 


3. Next take a strip apply glue to where the fabric folds and just shape it on the lamp shade in the design you want. Try to scrunch it and make it look wavy. I did mine evenly spread and then went back in and filled in the spaces just to make sure I had enough burlap.


Finished product! Its extremely easy to do. Just be ready to get burned just a little bit!! 


Enjoy! 

XoXo Bon


Sunday, August 5, 2012

Random.

Top Knot

I have been on another blogging absence and I apologize!! I went to dinner with a couple of friends the other night to celebrate one of them being done with summer school. Gahhh made me really wish I was  back in college! When I was digging around in my closet for my outfit for the night I picked out a top that needed an up-do I thought. I have practiced and practiced the top knot, watched you tube after you tube and have now finally figured out what worked for my brown, thin (extremely thin), straight, semi long hair. Here is a HOW TO on the top knot I have found the easiest for me and hopefully my readers!


How to:

First you need a few supplies:

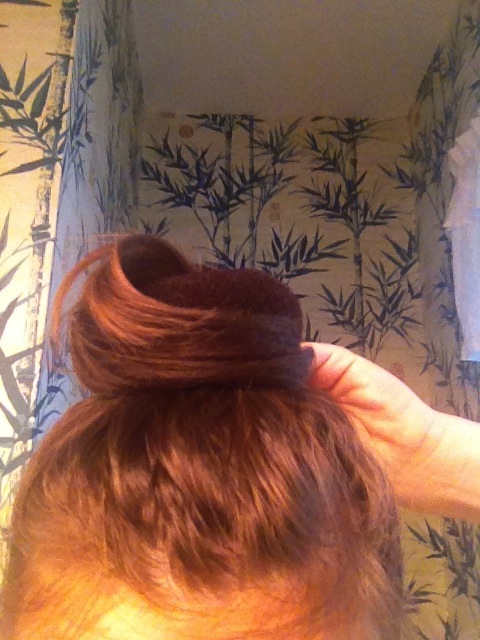
I have to use this bun maker from Sally Beauty Supply (have in black, brown and blonde) because I don't have enough hair to make a top knot. If I didn't use this it would just look like a normal bun on the top of my head. 


I also had to use bobby pins to tuck some of my flying hairs in

Also, you might want a little hairspray. I use it for everything so of course I did a few finishing touches of hair spray.


Making the top knot:

1. Make a high pony tail and tie with any pony tail holder.


2. Slip the bun maker over the pony tail. So that the pony tail is coming out of the middle of the bun maker.


3. Then wrap your hair around the bun maker and just pull the hair to make sure it is all covered and use about 4 pins and secure the hair. Then hair spray. It will take you a few tries to make sure you have all the bun maker covered. 


This is how I formed my hair around the bun maker. I use both hands and just smooth it so it covers it all but I can't take pics and do it at the same time!

4. Pin in a few bobby pins so that it want fall down.

5. Spray with hair spray to hold!

If this process doesn't work for you just search top knot's on you tube. I follow a few different blogs and each blogger did their top knot different ways. Just find what works best for you. This is a great way for straight thin hair. Someone with thick hair probably wouldn't need the bun maker or could look   to big. 


Enjoy!

XoXo Bon